How To Dreamweaver (set up divs)
Our goal is to create a web page with the following sections called DIVs:
- Container
- Header (will hold our company name and Logo etc)
- Nav (will hold our navigation) For this excercise we will assume 4 or 5 links on one horizontal line
- Main
- Footer (will hold copyright and let users know where the page ends, last updated information etc)
Step 1 of 3
- Step 1 (use Dreamweaver to do the lions share of the layout for the divs)
- Open dreamweaver
- File / New
- Make selections based on Fig 1 and click create
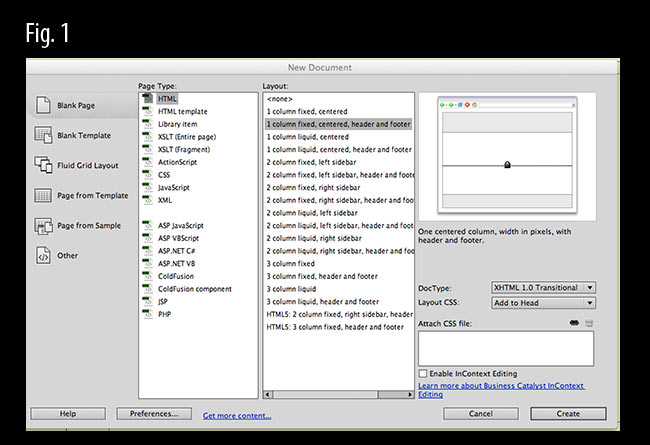
- This is what the web page will look like (melaniestewart.com/webdesign/divs/step1.html)
- Review the code (about 160 lines), Make a mental note of where the CSS and divs are located and how they conceptually connect
STEP 2 (add another div for our navigation bar) Now we will insert another div to hold our navigation
- Place your cursor in the code view panel between the header and content tags
- Insert/ Common / Insert Div Tag (right panel)
- select at insertion point
- type navigation in the DIV ID field
- click ok
- Insert/ Common / Insert Div Tag (right panel)
- Your code will look like this after
- <div class="header"><a href="#"><img src="" alt="Insert Logo Here" name="Insert_logo" width="180" height="90" id="Insert_logo" style="background-color: #C6D580; display:block;" /></a>
<!-- end .header --></div>
<div id="navigation">Content for id "navigation" Goes Here</div>
<div class="content">
- <div class="header"><a href="#"><img src="" alt="Insert Logo Here" name="Insert_logo" width="180" height="90" id="Insert_logo" style="background-color: #C6D580; display:block;" /></a>
- The web page will now look like this http://melaniestewart.com/webdesign/divs/step2.html
- Alternatively, if you had set up our style with a class, rather than an ID -DIV you would end up with this webpage instead (I set the background of the nav bar in red).
Step 3a (navigation bar with table - project 2)
- We will insert a table based navigation bar
- Highlight all the text in navigation section
- Insert Table (select 1 row and as many columns as you have links)
- in each cell add the name and link to the file (fine if it is not made yet)
- see Step 3A
- in each cell add the name and link to the file (fine if it is not made yet)
- Insert Table (select 1 row and as many columns as you have links)
Step 3b (navigation bar with css - project 3)
We will start this after Project 2 is submitted
Central Concept
Don't forget NOTE:
- BEFORE you set up this in dreamweaver you need to know what your rules and layout will be. Use this warm up excercise to get your organization started.
- There are many methods to impliment CSS.
- Remember, CSS applies to the styling as well as the layout