Box Dimensioning
In a nutshell, conceptually your boxes will be either: sized, shrink wrapped, or stretched. This concept was taken from Chapter 5 of the book Pro CSS and HTML Design Patterns by Michael Bowers.
Sized
Use when you want to set the width or height of an element to a measurement or percentage of it's containing block's height and width.
How: apply style to class or ID/Div
Sized example
SELECTOR {width:+value; height:+value; }
Shrink Wrapping
Use when you want to shrinkwrap the width or height of an element to fit the width or height of its content.
Shrinkwrapped float example
SELECTOR {width:auto; height:auto; float:left_right;}
How: apply style to class or ID/Div
Stretched
You can stretch the width or height of an element to fill the width or height of its container. This strecches the inside of the box contents to the container's width. Caution overflow issues if content exceeds parent border and padding...
How: apply style to class or ID/Div
Horizontally Stretched Absolute Element
SELECTOR {width:auto; left:0; right:0; position:absolute;}
Z index concept
So far we have positioned all the boxes as if they were on the same layer (like in photoshop). If we want to have layers overlap each other, then we could specify the layer order based on a Z third dimension co-ordinate. This is called the Z Index, the largest number is the top, the lower the bottom. The Z example below shows what it would look like:
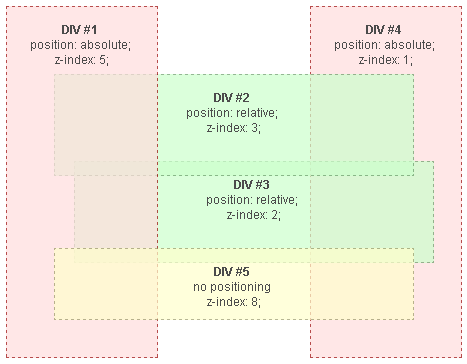
https://developer.mozilla.org/@api/deki/files/912/=Understanding_zindex_03.png